

Question

MCP Registration URL missing for ChatGPT Connector

  • July 21, 2026
  • 2 replies
  • 22 views

Lorin
Forum|alt.badge.img+1

Hi,

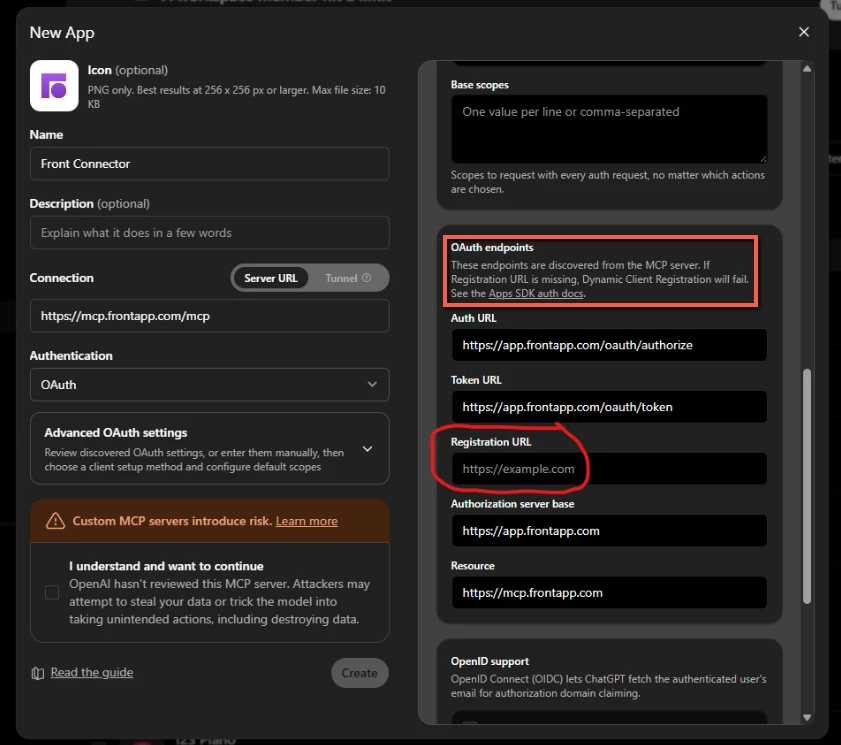
I am following your steps for connecting our Ai assistant (ChatGPT), but the Registration URL does not auto-populate. What is the Registration URL for Front’s MCP?

A walk-through video showing how to connect Ai assistants would be extremely helpful (Section 2 in https://dev.frontapp.com/docs/mcp-server)
 

2 replies

martin_silva
Forum|alt.badge.img+1

Hey ​@Lorin !

Thanks for the screenshot and feedback. The short answer is: there is no Registration URL to enter, and you can leave that field blank for our MCP server.

That field only applies to Dynamic Client Registration (DCR), where the AI assistant registers itself automatically with the server. Front doesn't support DCR by design. Instead, Front's MCP server uses a confidential OAuth connection: you create your own OAuth app in Front and give ChatGPT its Client ID and Client Secret. That's why the field never auto-populates, and why ChatGPT warns that "registration will fail" — it's expecting DCR, which we intentionally don't offer. (Your Auth URL and Token URL discovered correctly, so the rest of the config is fine.)


Here's the path that will work:

1. In Front, create a developer app, then in the Features tab add an OAuth feature. Note the Client ID and Client Secret.
2. In that OAuth feature, add ChatGPT's redirect/callback URL. ChatGPT shows this under Advanced settings when you set up the connector — it's typically https://chatgpt.com/connector_platform_oauth_redirect. Register exactly what ChatGPT displays.
3. Under Feature Access, enable only "MCP Server" (enabling other feature types can cause 403s during authorization), and select the resource permissions you want the agent to have: read, write, and/or send.
4. Back in ChatGPT, leave Registration URL blank. Open Advanced OAuth settings and enter the Client ID and Client Secret from step 1. Leave the Auth URL and Token URL as discovered.
5. Save and complete the OAuth sign-in. Each user authorizes individually, and the agent inherits that user's Front permissions.


Tell me if this is useful! Thanks again


Lorin
Forum|alt.badge.img+1
  • Author
  • Conversationalist
  • July 21, 2026

Thanks Martin!


I got all the way to Step 5, but I’m now getting this Error in ChatGPT when trying to ‘connect’ the App to my account. *ChatGPT's redirect/callback URL was not shown to me in the Advanced Settings, so I used the URL that you said was typical: https://chatgpt.com/connector_platform_oauth_redirect


When trying to connect my Chat GPT account to the Front App/Connector that I just created, I get this error message. 


Front Settings: